A Step-by-Step Guide To Installing Lighting Circuits: From Planning To Completion
Welcome to our step-by-step guide to installing lighting circuits: from planning to completion. Whether you’re a seasoned DIY enthusiast or a beginner looking to take on a new project, this article is here to guide you through the process with ease. So, grab your tools and let’s get started!
Installing lighting circuits may seem daunting at first, but with the right knowledge and a little bit of patience, you’ll be able to brighten up any space in no time. From planning the layout to completing the final installation, we’ll cover everything you need to know. So, whether you’re looking to update the lighting in your home or tackle a new construction project, this guide has got you covered.
In this comprehensive article, we’ll break down the process into simple steps, providing you with clear instructions and helpful tips along the way. We’ll discuss the importance of proper planning, explore different types of lighting fixtures, and guide you through the wiring and installation process. By the end, you’ll have the skills and confidence to create a well-lit and visually appealing space. So, let’s dive in and shed some light on the world of lighting circuits!
A Step-by-Step Guide to Installing Lighting Circuits: From Planning to Completion
Installing lighting circuits may seem daunting, but with proper planning and step-by-step guidance, it can be a manageable DIY project. Here’s how to get started:
- Assess your lighting needs and create a lighting plan.
- Gather the necessary tools and materials.
- Turn off the power and locate the circuit box.
- Install the circuit breaker and run the electrical cable.
- Connect the cables to the switches and outlets.
- Mount the light fixtures and connect the wiring.
- Test the circuit and make any necessary adjustments.
- Secure the cables and close the circuit box.
- Enjoy your newly installed lighting circuits!
Remember to always prioritize safety and consult a professional if you’re unsure about any step. Happy installing!

A Step-by-Step Guide to Installing Lighting Circuits: From Planning to Completion
Lighting is an essential aspect of any space, providing both functionality and aesthetic appeal. Whether you are renovating your home or building a new one, understanding how to install lighting circuits is crucial. This step-by-step guide will walk you through the process from planning to completion, ensuring a successful and safe installation.
Planning Your Lighting Circuit
When it comes to installing lighting circuits, proper planning is key. Before you begin, take the time to assess the needs of your space and determine the type and number of lighting fixtures you require. Consider the function of each area and the desired ambiance. Sketch out a lighting plan, indicating the location of each fixture and the wiring routes.
Next, calculate the total wattage of all the fixtures you plan to install. This will help you determine the appropriate circuit size and prevent overload. Consult the National Electrical Code (NEC) guidelines to ensure compliance with safety regulations. It’s also essential to check your local building codes, as requirements may vary.
Choosing the Right Wiring Method
Once you have a lighting plan in place, it’s time to choose the right wiring method for your circuit. There are several options to consider, including:
1. Conduit Wiring: This method involves running wires through metal or plastic conduits. It provides excellent protection and flexibility, making it ideal for exposed areas or spaces with high moisture levels.
2. Non-Metallic Sheathed Cable (NM): NM cable, commonly known as Romex, is a popular choice for residential applications. It consists of copper wires encased in a plastic sheath, providing insulation and ease of installation.
3. Armored Cable (AC): AC cable features metal armor that protects the wires from damage. It is suitable for both indoor and outdoor use and offers enhanced durability.
4. Metal-Clad Cable (MC): MC cable consists of multiple insulated wires wrapped in a metal sheath. It provides excellent protection against physical damage and is commonly used in commercial and industrial settings.
Consider the specific requirements of your project and choose the wiring method that best suits your needs.
Gathering the Necessary Tools and Materials
Before you begin the installation process, gather all the necessary tools and materials. Some common items you may need include:
– Wire cutters and strippers
– Screwdrivers
– Electrical tape
– Wire nuts
– Fish tape or pull string
– Circuit breaker
– Lighting fixtures
– Electrical wire
– Junction boxes
Having everything on hand will ensure a smooth and efficient installation process.
Installing the Lighting Circuit
Now that you have completed the planning phase, it’s time to start installing your lighting circuit. Follow these step-by-step instructions for a successful installation:
1. Turn off the power: Before working on any electrical circuit, always turn off the power at the main breaker. Verify that the power is off using a non-contact voltage tester.
2. Install the junction boxes: Begin by installing junction boxes at each location where you plan to have a lighting fixture. These boxes will house the wiring connections and provide protection.
3. Run the wires: Using your chosen wiring method, run the appropriate wires from the circuit breaker panel to each junction box. Ensure the wires are properly secured and protected along the route.
4. Connect the wires: Inside each junction box, connect the wires according to the manufacturer’s instructions. Use wire nuts or other approved connectors to secure the connections.
5. Install the lighting fixtures: Once the wiring connections are made, install the lighting fixtures according to the manufacturer’s instructions. Ensure that all fixtures are properly grounded.
6. Test the circuit: After completing the installation, turn the power back on and test the circuit. Check each lighting fixture to ensure proper functionality and address any issues that may arise.
Ensuring Safety and Compliance
Throughout the installation process, it’s crucial to prioritize safety and comply with electrical codes. Here are some important safety tips to keep in mind:
– Always use appropriate personal protective equipment, such as safety glasses and gloves.
– Never work on live circuits. Always turn off the power before making any electrical connections.
– Avoid overloading your circuit by calculating the total wattage and ensuring it does not exceed the circuit’s capacity.
– Use the correct wire size for the circuit to prevent overheating and potential fire hazards.
– Secure all wiring connections properly to avoid loose or exposed wires.
By following these safety precautions and adhering to electrical codes, you can ensure a safe and successful lighting circuit installation.
Conclusion
Installing lighting circuits may seem like a daunting task, but with proper planning and a step-by-step approach, it can be accomplished successfully. Remember to plan your circuit, choose the right wiring method, gather the necessary tools and materials, and follow the installation instructions carefully. Prioritize safety throughout the process and comply with electrical codes to ensure a safe and functional lighting system in your space.
Key Takeaways: A Step-by-Step Guide to Installing Lighting Circuits
- Planning is crucial before starting any lighting circuit installation.
- Ensure you have the necessary tools and materials before beginning the project.
- Start by turning off the power supply to the area where you’ll be working.
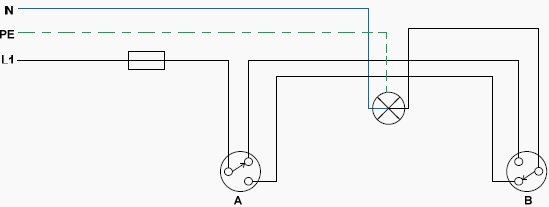
- Follow the wiring diagram carefully to connect the cables and components.
- Test the circuit to ensure proper functionality before completing the installation.
Frequently Asked Questions
1. What are the initial steps for planning a lighting circuit installation?
Before starting a lighting circuit installation, it is crucial to plan carefully to ensure efficiency and safety. Here are the initial steps you should follow:
First, assess the lighting needs of the space and determine the number and types of fixtures required. Consider factors such as the room size, purpose, and desired lighting effects.
Next, create a detailed lighting plan, indicating the placement of each fixture and the circuit layout. This plan will help you calculate the electrical load and determine the appropriate wire gauge and circuit breaker size.
2. What tools and materials will I need for installing lighting circuits?
To successfully install lighting circuits, you will need a few essential tools and materials. Here’s a list to help you get started:
– Wire strippers: Used to remove insulation from the wires.
– Screwdrivers: Required for connecting wires to switches and fixtures.
– Wire nuts: Used to securely connect wires together.
– Electrical tape: Helps insulate and protect wire connections.
– Circuit breaker panel: Houses the circuit breakers for the lighting circuits.
– Electrical wires: The conductors that carry electricity from the power source to the fixtures.
– Light fixtures: The lighting units that provide illumination in the space.
– Switches: Used to control the on/off function of the lights.
3. How do I safely install lighting circuits?
Ensuring safety during the installation of lighting circuits is of utmost importance. Here are some key steps to follow:
1. Turn off the power: Before starting any electrical work, switch off the power at the circuit breaker panel to prevent the risk of electric shock.
2. Use proper wiring techniques: Follow the appropriate wiring methods, such as using wire nuts to secure wire connections and routing wires away from potential hazards.
3. Test connections: After making wire connections, use a voltage tester to check for the presence of electricity. This will help identify any faulty connections or live wires.
4. Grounding: Ensure that the lighting circuit is properly grounded to minimize the risk of electrical faults and protect against electrical shock.
5. Seek professional help if needed: If you are unsure about any aspect of the installation process or encounter complex electrical issues, it is best to consult a licensed electrician.
4. How can I troubleshoot common issues during lighting circuit installation?
While installing lighting circuits, you may encounter some common issues. Here are a few troubleshooting tips:
– Flickering lights: Check for loose connections or damaged wiring. Tighten any loose connections and replace any faulty components.
– Non-functioning switches: Ensure the switches are wired correctly and securely connected. Test the switches with a voltage tester to identify any issues.
– Overloaded circuits: If the circuit breaker trips frequently, it may be due to an overload. Verify that the total wattage of the connected fixtures does not exceed the circuit’s capacity.
– Dim lights: Insufficient voltage or incorrect wiring can cause dim lights. Verify the voltage supply and ensure the correct wiring connections.
5. Are there any safety precautions I should take during the lighting circuit installation?
Yes, there are several safety precautions to keep in mind during the installation of lighting circuits:
– Always turn off the power at the circuit breaker panel before working on any electrical connections.
– Use insulated tools to minimize the risk of electrical shock.
– Avoid working in wet conditions or with wet hands to prevent electrical hazards.
– Do not overload circuits by connecting too many fixtures or devices.
– Follow local electrical codes and regulations to ensure compliance and safety.
– If you are unsure about any aspect of the installation process, consult a licensed electrician.
Electrical Wiring Basics
Conclusion: Wrapping Up Your Lighting Circuit Journey
And there you have it, the step-by-step guide to installing lighting circuits from planning to completion! You’ve learned how to carefully plan your circuit layout, calculate the load requirements, select the appropriate cables and components, and safely wire everything together. It’s been quite a journey, but now you have the knowledge and skills to tackle any lighting circuit installation project with confidence.
Remember, safety should always be your top priority when working with electrical systems. Don’t forget to turn off the power, use proper insulation, and follow all the necessary precautions. With practice and attention to detail, you’ll become an expert at installing lighting circuits in no time.
Now, armed with this guide and your newfound expertise, you can brighten up any space with beautiful and functional lighting. Whether it’s a home renovation, a commercial project, or simply adding some ambiance to your backyard, you’re ready to take on the challenge. So go ahead, let your creativity shine and illuminate the world around you!
Final Thought: Shedding Light on Your Electrical Skills
Congratulations on completing this comprehensive guide to installing lighting circuits! By following the steps outlined in this article, you’ve gained valuable knowledge that will serve you well in your electrical endeavors. From understanding the importance of proper planning to executing the wiring with precision, you’ve gained the skills needed to bring light into any space.
As you continue to practice and refine your electrical skills, don’t forget to stay up to date with the latest industry standards and safety regulations. Electrical systems are constantly evolving, and it’s crucial to stay informed to ensure the safety and efficiency of your installations.
So, whether you’re embarking on a DIY project or pursuing a career in electrical work, remember that installing lighting circuits is both a science and an art. With your newfound knowledge and the right tools at hand, you have the power to brighten up the world and create spaces that are not only functional but also visually stunning. Keep shining, and may your electrical endeavors be a beacon of success!